Monday, August 25, 2014

Who knew - the real first "Jeep"

Antique Farm Machinery Show and the First Jeep

The best part of taking the Farm Jeep to antique machinery shows is the chance to meet people and learn more about how jeeps were used on the farm.  At a recent show held in Greensburg, Indiana, Barry heard from several people who had (or knew someone who had) used a jeep to tow a hay baler.  One advantage of using a jeep to tow a powered baler (the baler had its own engine) was the speed the jeep provided in moving between fields.

But the real lesson of this show was the discovery of a "jeep" we didn't know existed, a "jeep" with it roots firmly planted  in the tractor world.  The featured tractor of the show was the Minneapolis-Moline and while wandering through the extensive and very interesting display, Barry spotted a sign that had the words Victory Jeep (there may have been other words, but these caught his eye).  He headed for the club tent and  asked if someone could tell him about the jeep sign.  The immediate response was "You need to talk to Cheryl."

Cheryl turned out to be a great source of information.  She not only publishes "The Prairie Gold Rush" a quarterly magazine for Minneapolis-Moline enthusiasts, but owns a NTX  Jeep!   The NTX was designed as a military vehicle, not as a tractor.  Cheryl sent us this photo and included the following note -

"I have attached a picture of the NTX's we displayed at the Rice Lake WI Show in June of this year. It is the most NTX Jeeps we have ever gathered in one place. However, there are still at least 18 more out there we know of (in various degrees of restoration of course) that did not show up. There were 840 built (which we are sure of) and really don't know how many have survived. They are a really fun vehicle to own. My NTX is gray, the closest one in the picture with the American flags."


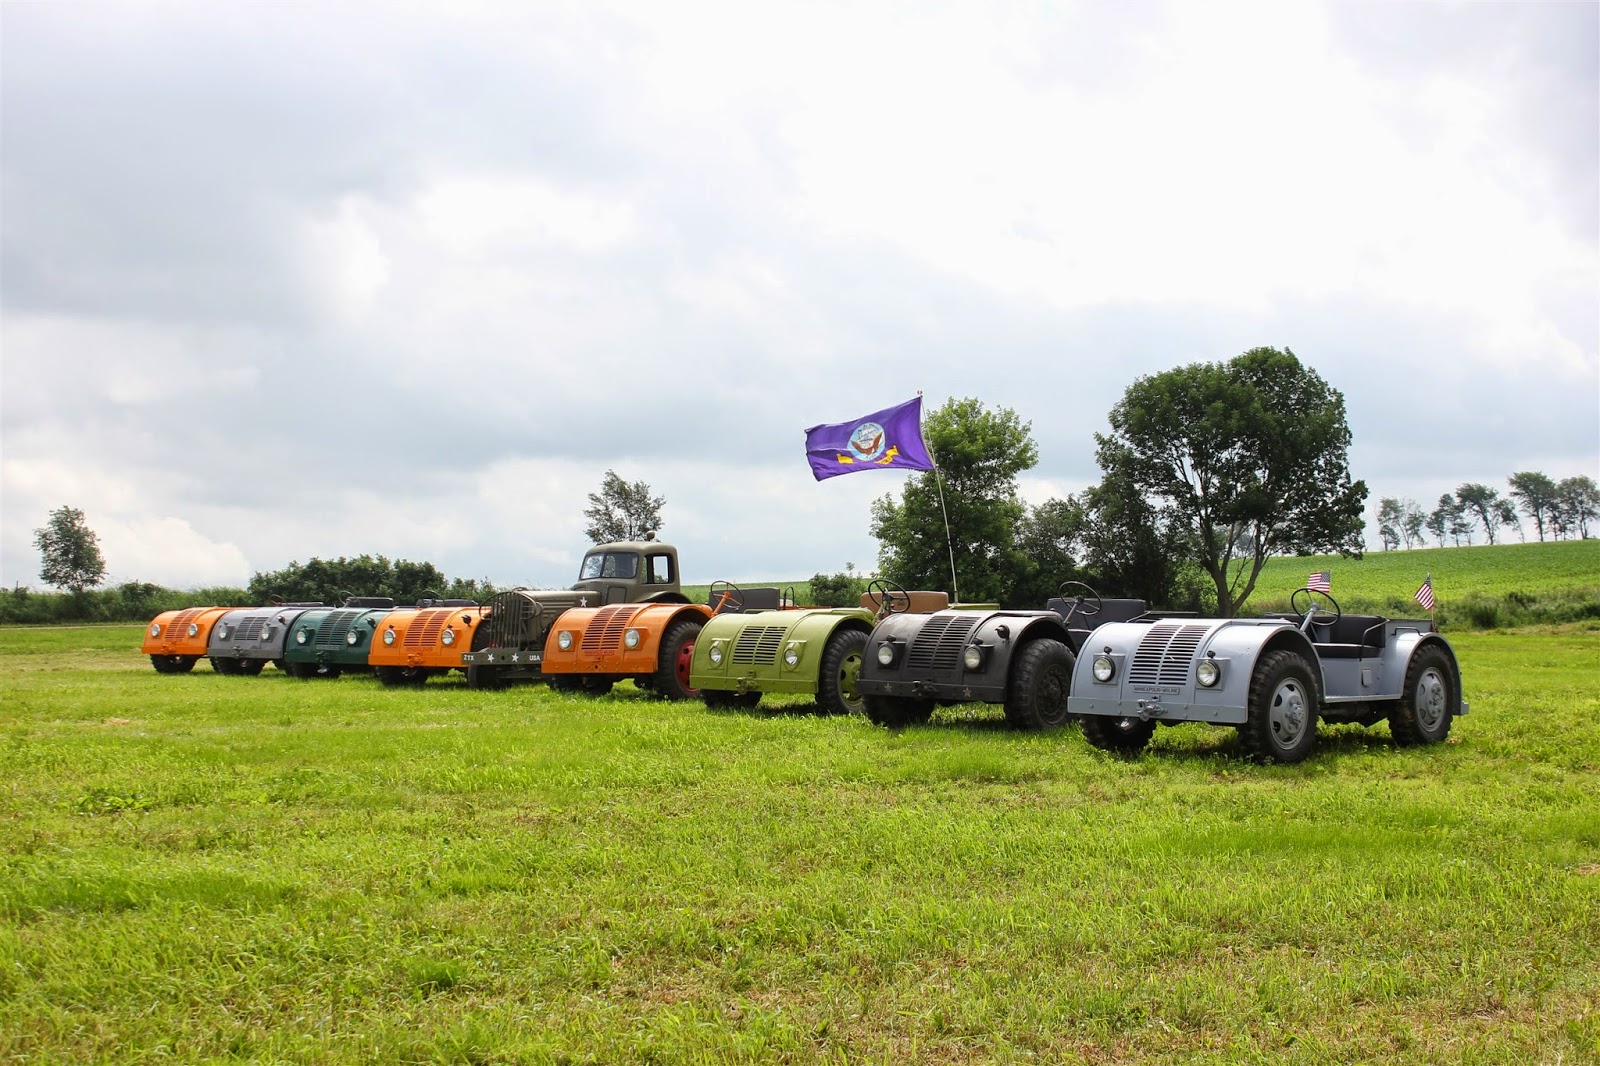
 Also included in this group shot is the NTX that made an appearance in the 1944 movie The_Fighting_Seabees.

Other MM folks were quick to point out that Willys had stolen the "jeep" name and had been sued by MM to stop them from using it.  Hmmm,  the Farm Jeep doesn't have the word Jeep stamped anywhere on the body.   Could it be they are correct? After this quick history lesson, it is clear that this was the first vehicle with the "jeep" name and it was not a Willys.  For more info on the NTX, check out this article- The Industrial Jeep - 1943 NTX

Just what is a tractor?

Following this informative encounter, Barry headed over to the RFD network's Classic Tractor show exhibit.  They were covering the show and selling DVDs and other tractor related items.  Barry didn't see any Farm Jeep information and inquired if they might have any jeep related items.  The short answer was "No, we do tractors, not jeeps."  The challenge was on, so Barry did his best to educate them.  He showed them copies of ads and tried to make his case that the jeep should be on the tractor show.  Time will tell.

Six degrees of separation?

Following the conversations with Cheryl and the RFD crew, Barry started looking for more NTX information  and  came across some interesting facts.  From the CJ3a info page -

"Willys involvement with farming and tractors started long before the Jeep. After WWI tractors started to replace the horse on the farm. At this time John N. Willys, with several partners, purchased the Moline Plow Co. and Willys-Overland produced the Universal Tractor. In the 1920's Mr. Willys sold out to his partners. For more information about the Moline Plow Company see the unofficial Minneapolis-Moline web-site."


Barry passed this information along to the MM folks, in hopes that they might feel more kindly toward the Farm Jeep.  He also came across a site with great Farm Jeep history.  Check out This-Old-Jeep.com.

We look forward to more shows and learning more about our version of the Jeep. 

Sunday, August 10, 2014

Pumps, Plows and Prizes!

There are instructions for that…

After installing the new motor, we were ready to get the hydraulic pump attached and ready to work.  Before remounting the pump, Barry wanted to replace the shaft seal, to cure the slow leak.  As noted elsewhere, Newgren used the same pump found on an International Harvester Model C tractor.  A search found that the seal was available and an order placed.  When the seal arrived, it was a pretty simple process to take the pump apart and remove the old seal.  The new seal was tapped in place and we were ready to mount the pump.
Above is pictured a portion of the pump bracket and the crankshaft pulley with the "special nut" installed.  Set screws (small dots) are visible on either side of the threaded crankshaft 
The pump connects to the crankshaft with a “special nut” (a steel bar with a short stud at each end), a rubber disk and a matching steel bar with studs that fits on the pump shaft.  We have installed and removed the pump probably a dozen times over the years, so don’t need the installation instructions.  Or so we thought.

We quickly mounted the pump and started the engine.  The lift worked perfectly for a few minutes.  And then it stopped working.  A quick inspection showed that the special nut had come loose from the pulley and was allowed the coupling to slip.  The pump wasn’t turning fast enough to work.  No problem, we just need to tighten the “special nut” on the crankshaft.  Making sure it was tight, we tried again, with the same results.

Time for a bigger hammer, or in this case a bar between the studs to REALLY tighten the nut.  This did keep the nut from coming loose, but created a huge oil leak out the end of the crankshaft!  Rather than report the hours spent trying to stop the leak, we will simply report the fix.  We needed a new “slinger” behind the timing chain cover and, mostly importantly, we used Permatex Ultra Black sealer between the shaft and pulley.  Time to attack the problem of the nut coming loose – over tightening was not the answer.

It was clear that the problem had surfaced with the pump seal replacement.  More force was required to turn the pump when it was not leaking (a good thing).  The original instructions called for two small set screws on the “special nut” to be removed with the nut in place against the pulley.  Two small holes were to be drilled into the face of the pulley (using the set screw holes as a guide).  We had not figured out how to do this without removing the front of the jeep, so had just tightened the set screws against the pulley face.
Figuring that the average farmer or Willys dealer would have not wanted to remove the radiator and grill, there must have been a method for drilling the holes.  We have a right-angle power drill and it worked perfectly for the task.  Regardless of the method used, the properly installed special nut hasn’t come loose.  Another lesson learned for us.  Follow the instructions!

A Newgren plow of our own!


Our friend Craig loaned us his early Newgren plow to display with our jeep a couple of years ago.  Since then we have been telling Craig that if he won’t sell us his plow, he should help us find our own.  And he did just that!

Craig had sent me a note about attending an antique tractor parts meet.  Not being able to attend, Barry did tell him to bring home a Newgren plow if he saw one.  Craig sent back an ad for a Newgren plow near Knoxville, TN.   Three days later, Barry made a flying trip to pick up the plow.

It is a beautiful later model 2-12 slat plow.  It is missing the coulters and the gauge wheel bracket, but the other parts are in excellent condition.  We will be looking for the missing parts and working with plow expert Clint Dixon to bring it back to its original state.  Clint says that he knows of only 7 other examples of the later tall mast Newgren plows.  That makes it even more exciting.

A prize of our own…


In addition to attending antique machinery shows, we have wanted to take the farm jeep to the local county fair.   We finally had a chance to enter the antique farming exhibit.  While we hadn’t expected to be judged, we ended up with a blue ribbon.   The blue ribbon was for “best in class” and being the only entry in the jeep class, we were an automatic winner.  Still, we will proudly display the ribbon in garage.

This was also the first time we have displayed the jeep backwards.  It had become clear that with the front end of the jeep lined up with the fronts of other tractors we presented no clues about the jeep as a tractor.   Visitors would glance at the jeep and walk on down the line.  If we could get them to the rear of the display, interest went way up.

So the fair offered an opportunity to try our reverse display.  It was an absolute success.  This is how we will display the jeep at future shows.


Friday, June 6, 2014

Out with the old... In with the older...

Ole Blue arrived without a motor and the engine we purchased had most likely spent is former life in a welder application.  But an L-134 is an L-134 and the engine got us on the road.  However, the engine smoked, we had some oil pan issues and even after an oil pump change we saw very low pressure.  More critical was a noise from the clutch.  We had picked up a rebuilt L-134 engine with the idea of doing a swap and fixing the clutch.  Like many of our projects, this one took some time, but we did get the job done.


Unbolt this, disconnect that

Since this was an engine swap, we took advantage of the jeeps simple constructions.  By removing the fenders, grill and radiator, we had easy access to the engine.  We did have to remove all the wiring in the front end, but again, the jeep is a simple vehicle.  The most important tool at this point is an engine hoist with a load leveler the attaches to the head bolts.  The second most important tool is a digital camera to take lots of pictures, especially of the wiring, to aid in the reassembly.

With only a couple of “hum, why isn’t it releasing”, the engine came free of the bellhousing and the transmission shaft.  We had chosen to unbolt the engine from the front mounts.  Hindsight tells us that should have unbolted the mounts from the frame.  We had to “lift” the front of the block, thus binding the engine on the shaft more than necessary.

There’s your problem

A quick look at the throw-out bearing and transmission shaft showed no wear or problems.  So the next task with the engine out was to remove the clutch.  As soon as the pressure plate was removed, the source of the clutch noise was evident.  The springs on the clutch disk had made contact with the bolts on the flywheel. Our installation way-back-when was our first and we assumed that the flywheel that came with the engine was the correct one.  With the new engine setting next to the old, the difference in the flywheels was obvious.

The old flywheel had been machined in the middle, lessening the clearance for the clutch disk.   So the good news was that we weren’t facing a major problem.  We had, not knowing what we might find, ordered a complete new clutch assemble.  We could have gotten by with just a new clutch disk, but at this point replacing everything seemed the wise path.

Mother of invention

The flywheel on the new engine was very rusty.  We decided to remove the flywheel to get it cleaned off.  The flywheel is held on by bolts, so removal should be simple.  Not so fast.  The flywheel fits on a hub at the end of the crankshaft and it is a tight fit.  No matter how we pulled, pushed and banged with a hammer, it wouldn’t budge.

Off to the internet for some advice.  The majority of advice was to “keep banging”.  However, there were those who said to use a puller.  A search of the internet didn’t turn up a single flywheel puller for an L-134 engine.  We have a few pullers that we have used to pull brake drums and steering components.  None of them were large enough to work on the flywheel.  It appeared it was going to be necessary for us to design our own puller.  We don’t have metal working tools, except for drills, saws and, of course, welders.  So the challenge was to come up with a simple design.

The first problem was figuring out how to attach the puller to the flywheel.  In a flash of “duh”, Barry figured he could use the clutch attachment holes.  A typical puller has a method of attaching to the object and a screw device in the center to apply pressure on the shaft.  The clutch attachment holes are in a triangle configuration, so we figured we could weld and drill some melt strips.

As Barry was taking some measurements, he spotted the old clutch pressure plate.  That was when the second “duh” moment happened.  We had a used pressure plate that had been in a box of parts we purchased.  Barry took a scrape piece of ¼” x 3” steel bar and cut it fit inside the back of the pressure plate.  He first drilled a hole and then welded a ½”square nut in the center of the pressure plate and inserted a ½” bolt.

With the plate welded to the pressure plate and the plate bolted to the flywheel, all that was left to do was to use a socket wrench to apply pressure to get the flywheel loose.  It took several turns, but the flywheel did pop off.  Clearly the heavy rust had resulted in “rust weld” and we aren’t sure any other method of removal would have worked as well.

Putting it all back together

There were a few components to be moved from the old engine to the new.  Although we had lots of room to remove and install the engine, we decided not to move things like the generator until after the basic install.
Using are handy clutch alignment tool the new clutch assemble was in place in minutes.  So now all we had to do was to drop the engine in and slide it back on the transmission shaft.   We used the clutch alignment tube to align the clutch disk and the transmission shaft so the engine should slide right in.  Should was the operative word.  We pushed, twisted and shoved, but the engine would go so far and then stop.

We pulled the engine back out and re-checked the alignment.  We even put a level on the motor to make sure the motor and the transmission were on the same plane.  Again, we would get the engine within an inch and it wouldn't move.  Time to stop for lunch and beers.

You know what they say

Beer makes everything better.  At least that is what we have been told.  All we know is that after lunch and a beer, Evan just leaned against the motor.  And it slid in place.  It must have been the beer.  We have no other way to explain what happened.  In any case we are making the beer frig an official tool box.

It takes a little time and then

With the engine back in place, we took our time getting everything back together.  While the new engine had lived on an engine stand, it didn't need a generator or accelerator.  So in addition to the normal connections, we had to add a few things to the motor. Having taken lots of pictures of the wiring and general engine compartment made life easier.   The rest of the install was uneventful.

It was time  
                                                                                                                     
With the essential wiring done (we could wait on the lights) it was time to see if the engine would start.  It had been sitting on the garage floor for months, but a few cranks to get fuel to carburetor and it fired!  The engine sounded great, with good solid oil pressure. 


With the engine running, Evan let out on the clutch and no noise!  The clutch problem was solved! We piled in and each took a turn at driving the jeep on the road.  What a great feeling!